
Microscopy Methods and Protocols
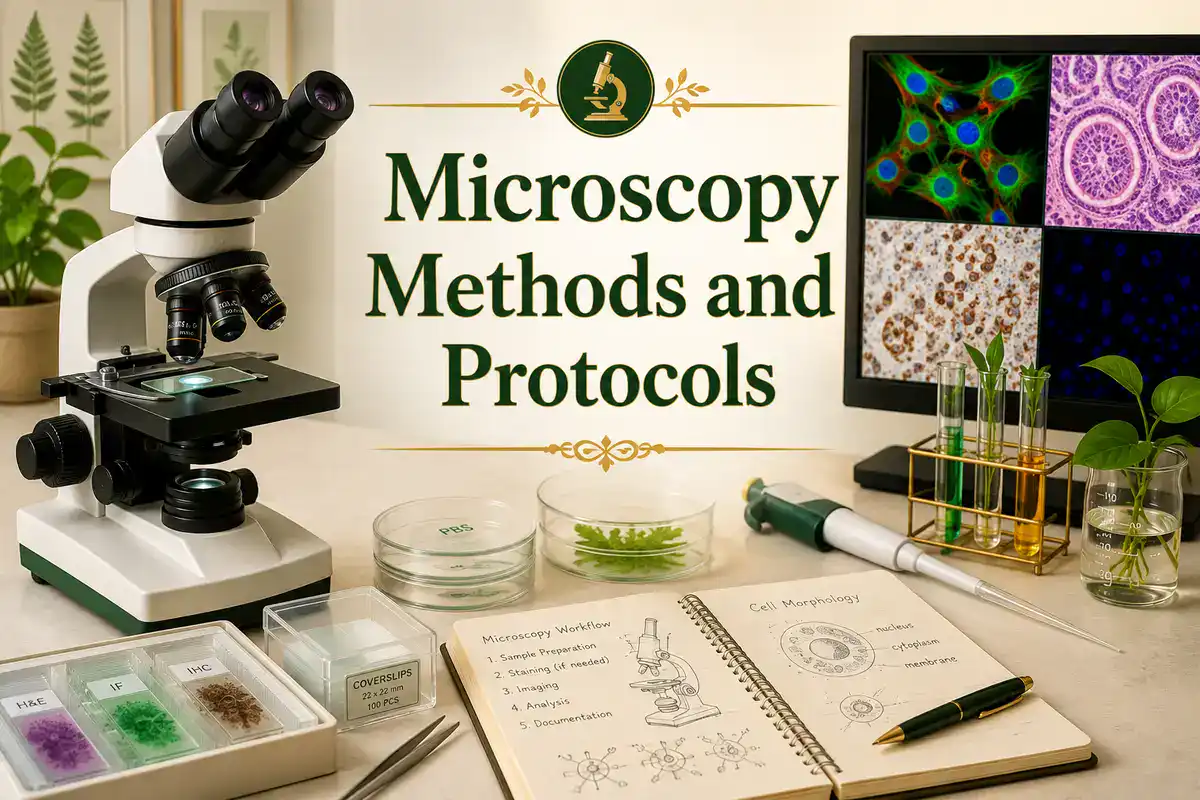
Microscopy methods are laboratory techniques used to see structures that are too small, too transparent, too fast-moving, or too complex to study with the unaided eye. In biology, microscopy helps researchers observe cells, tissues, microbes, organelles, embryos, chromosomes, protein localization, cell behavior, microbial colonies, stained tissue sections, live-cell dynamics, and ultrastructure.
Microscopy Methods Guide:
- What Are Microscopy Methods?
- Microscopy Methods Guide
- Core Microscopy Methods at a Glance
- Brightfield Microscopy
- Darkfield, Phase Contrast and DIC Microscopy
- Fluorescence Microscopy
- Confocal Microscopy
- Live-Cell Imaging
- Immunofluorescence and Immunocytochemistry
- Electron Microscopy: TEM and SEM
- Stereomicroscopy and Dissecting Microscopes
- Super-Resolution and Advanced Microscopy
- Sample Preparation for Microscopy
- Image Acquisition: What to Record Every Time
- Microscopy Controls
- Image Analysis and Bioimage Data
- How to Choose the Right Microscopy Method
- Common Mistakes in Microscopy Protocols
- Microscopy Calculators and Lab Tools
- Trusted Microscopy Method Resources
- Safety and Responsibility
- Related BioExplorer Resources
- Frequently Asked Questions
This page is a guide to major microscopy methods and protocols used in cell biology, microbiology, molecular biology, immunology, developmental biology, neuroscience, pathology, botany, zoology, and biomedical research. It explains what each method is for, how to choose the right microscope technique, what a good imaging protocol should include, where mistakes usually happen, and which trusted resources can help you go deeper.
A microscopy protocol is not just "put the sample under a microscope." A useful protocol explains the sample type, preparation method, stain or label, microscope mode, objective lens, illumination settings, exposure, controls, image acquisition plan, image analysis method, safety issues, limitations, and troubleshooting. Nature Protocols describes strong protocols as including reagents, equipment, timing, procedures, design advice, limitations, troubleshooting, data analysis, and result interpretation.
What Are Microscopy Methods?
Microscopy methods are imaging approaches that use light, electrons, scanning probes, stains, fluorescent labels, lenses, detectors, or computational processing to reveal details in small samples. Different methods answer different questions. A method that is excellent for live transparent cells may be poor for thick tissue. A method that shows protein localization may not show fine membrane ultrastructure. A method that gives beautiful images may still be weak for quantitative measurement if the controls are poor.
The method is the imaging technique. The protocol is the practical workflow for using it. For example, fluorescence microscopy is a method. A fluorescence microscopy protocol describes the sample preparation, fluorophores, fixation or live-cell conditions, objective lens, filter sets, exposure time, controls, image format, and analysis plan.
Microscopy overlaps closely with cell biology, cell biology methods, microbiology methods, immunology methods, molecular biology methods, biochemistry methods, developmental biology, histology, pathology, botany, neuroscience, and bioimage analysis.
Microscopy Methods Guide
Use this page as a practical map for common microscopy methods and biological imaging workflows.
- brightfield microscopy
- darkfield microscopy
- phase contrast microscopy
- differential interference contrast microscopy
- polarized light microscopy
- fluorescence microscopy
- confocal microscopy
- live-cell imaging
- immunofluorescence microscopy
- histology and stained tissue imaging
- stereomicroscopy and dissecting microscopes
- electron microscopy, including TEM and SEM
- super-resolution microscopy
- scanning probe microscopy
- sample preparation and mounting
- image acquisition, controls, and analysis
Core Microscopy Methods at a Glance
The table below gives a quick comparison of common microscopy techniques and the questions each one helps answer.
| Microscopy Method | Main Purpose | Common Biological Use |
|---|---|---|
| Brightfield microscopy | View stained or naturally pigmented specimens using transmitted light | Histology slides, bacteria after staining, plant tissues, prepared classroom slides |
| Darkfield microscopy | Make small unstained objects appear bright against a dark background | Thin microorganisms, small particles, transparent samples with strong scattering |
| Phase contrast microscopy | Improve contrast in transparent, unstained living cells | Cell culture monitoring, live-cell morphology, protozoa, transparent cells |
| DIC microscopy | Enhance contrast and edge detail in transparent specimens | Cells, embryos, tissues, unstained thick samples, fine structural differences |
| Polarized light microscopy | Reveal birefringent materials and ordered structures | Crystals, starch grains, fibers, mineralized tissue, plant structures |
| Fluorescence microscopy | Detect labeled molecules, proteins, organelles, or cells | Immunofluorescence, GFP reporters, cell markers, nuclei, cytoskeleton, pathogens |
| Confocal microscopy | Collect optical sections and reduce out-of-focus light | Thick cells, tissue sections, 3D reconstruction, colocalization, z-stacks |
| Live-cell imaging | Record changes in living cells over time | Cell migration, mitosis, signaling, organelle movement, wound-healing assays |
| Electron microscopy | Image ultrastructure at much higher resolution than light microscopy | Organelles, membranes, viruses, bacterial surfaces, tissue ultrastructure |
| Super-resolution microscopy | Resolve fluorescent structures below the ordinary light microscope diffraction limit | Protein organization, nanoscale cellular structures, cytoskeleton, membrane domains |
Brightfield Microscopy
Brightfield microscopy is one of the most familiar light microscopy methods. Light passes through or reflects from the specimen, and contrast comes from absorption, staining, pigmentation, or structural differences. It is widely used in teaching labs, histology, microbiology, botany, pathology, and routine slide observation.
ZEISS describes brightfield illumination as a method in which transmitted light passes through a specimen and is collected by the objective lens, while reflected light can also be used for surface imaging. Contrast depends on how much light specimen details absorb compared with the surroundings. See ZEISS Brightfield Illumination.
A useful brightfield microscopy protocol should state the sample type, slide preparation, stain if used, mounting medium, coverslip, objective lens, condenser setting, illumination level, focusing approach, scale bar, and image-capture settings. If the sample is a stained tissue section, the protocol should also state the stain and tissue-processing method. If it is a microbial smear, the staining method and fixation step matter.
Brightfield microscopy is simple and useful, but it has limits. Transparent living cells often have low contrast unless they are stained, and many stains are not compatible with live-cell imaging. That is where phase contrast, DIC, fluorescence, or other contrast methods become more useful.
Darkfield, Phase Contrast and DIC Microscopy
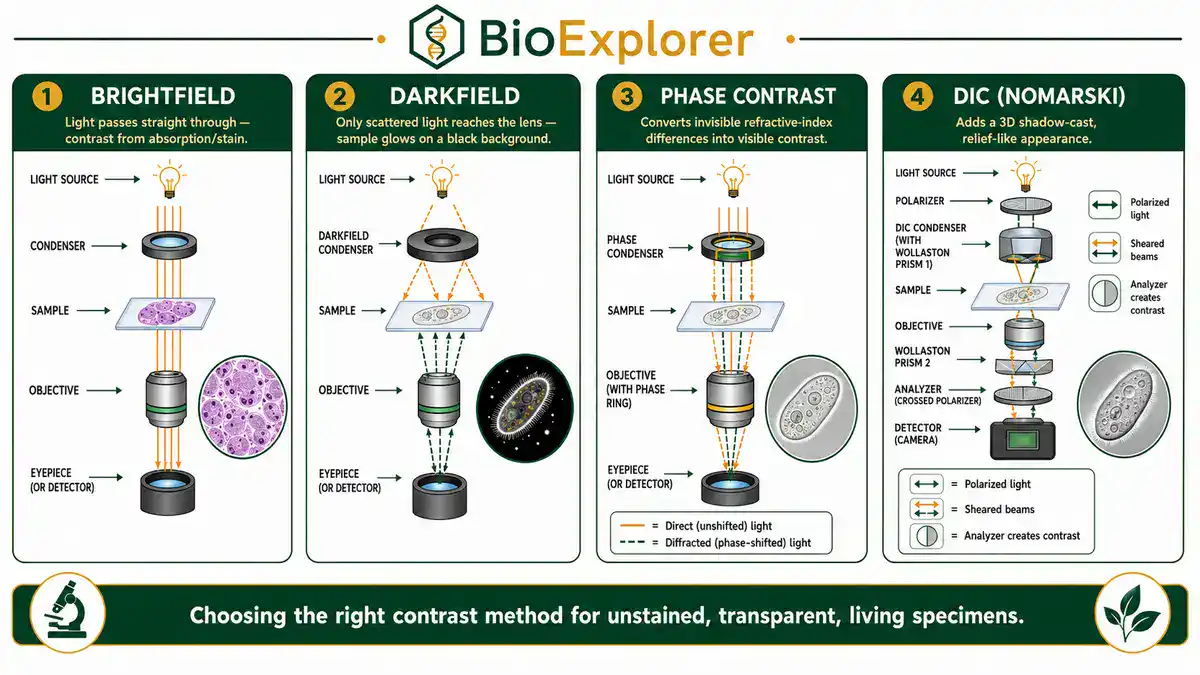
Darkfield microscopy, phase contrast microscopy, and differential interference contrast microscopy, often called DIC or Nomarski microscopy, are contrast-enhancing methods for specimens that are difficult to see clearly in ordinary brightfield.
Phase contrast is especially important for living, transparent cells because it converts differences in refractive index and thickness into intensity differences. Leica explains that brightfield often gives low contrast for transparent biological specimens, while phase contrast allows many living specimens to be observed without staining. See Leica's guide to phase contrast.
MyScope describes phase contrast as a method that enhances contrast between structures based on differences in refractive index. MyScope's light microscopy training also lists major transmitted-light techniques, including brightfield, darkfield, phase contrast, DIC, and polarized light microscopy. See MyScope Phase Contrast and MyScope Light Microscopy Techniques.
For imaging techniques that go beyond light microscopy, including cryo-EM and atomic force microscopy, see BioExplorer’s Biophysics Methods and Protocols guide.
A good phase contrast or DIC protocol should state the objective type, condenser settings, sample thickness, culture vessel or slide type, illumination, temperature or live-cell conditions, and whether the image will be used for qualitative observation or quantitative measurement. These methods are excellent for cell morphology, but they are not a substitute for molecular labeling when the question is about a specific protein, antigen, or organelle.
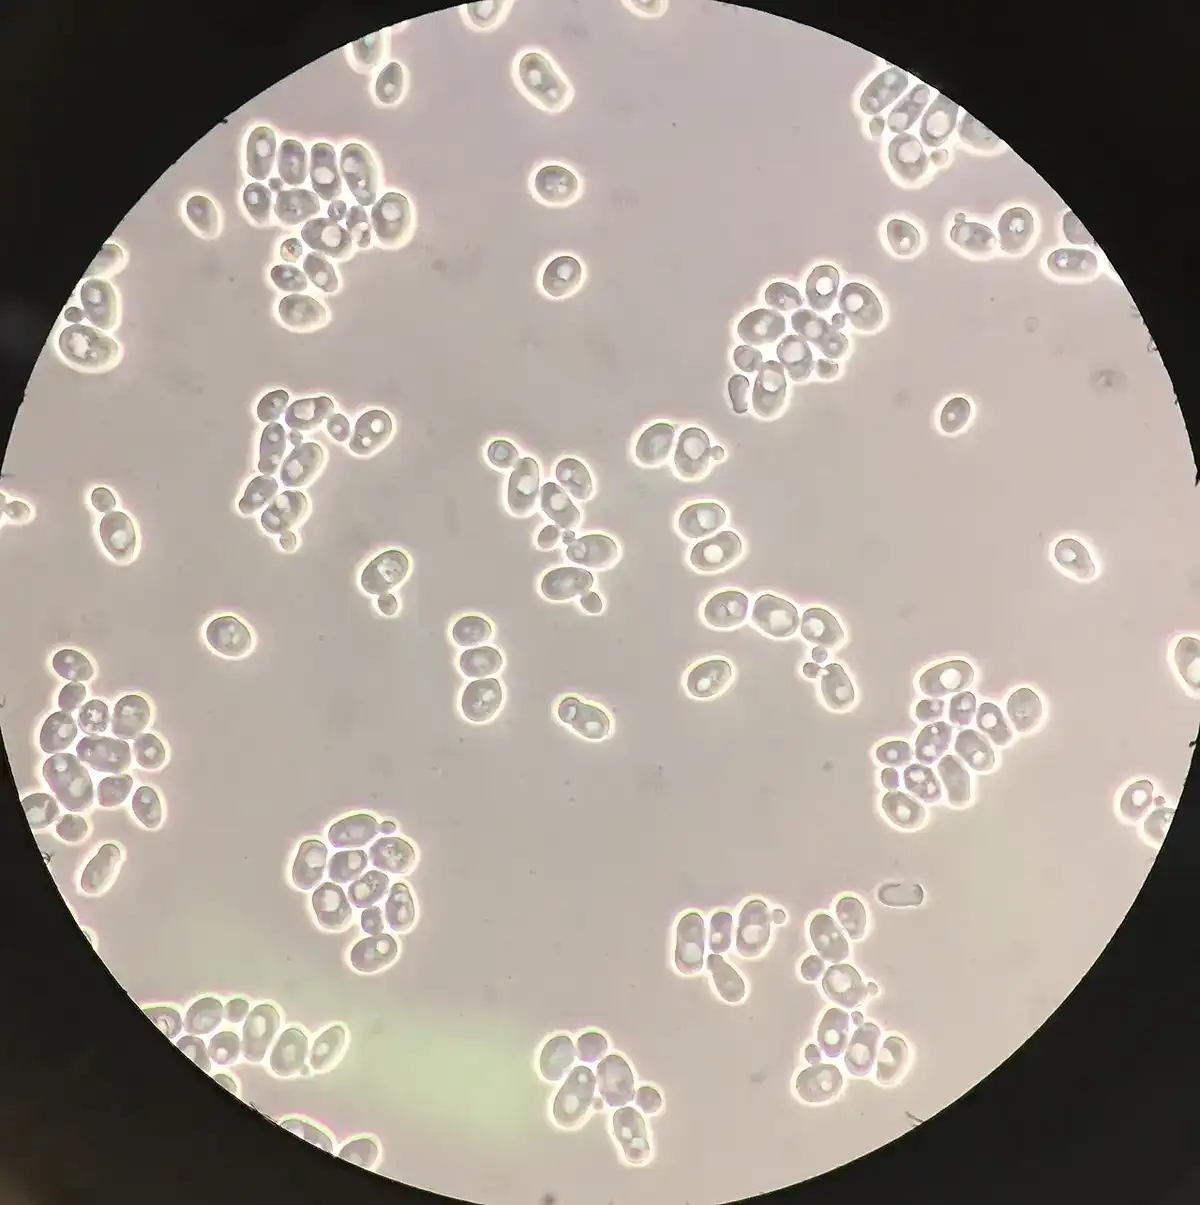
(CC BY 4.0
Fluorescence Microscopy
Fluorescence microscopy uses fluorophores that absorb light at one wavelength and emit light at a longer wavelength. It lets researchers detect specific molecules, proteins, nucleic acids, organelles, cells, pathogens, antibodies, reporter genes, and markers that would be hard to distinguish by shape alone.
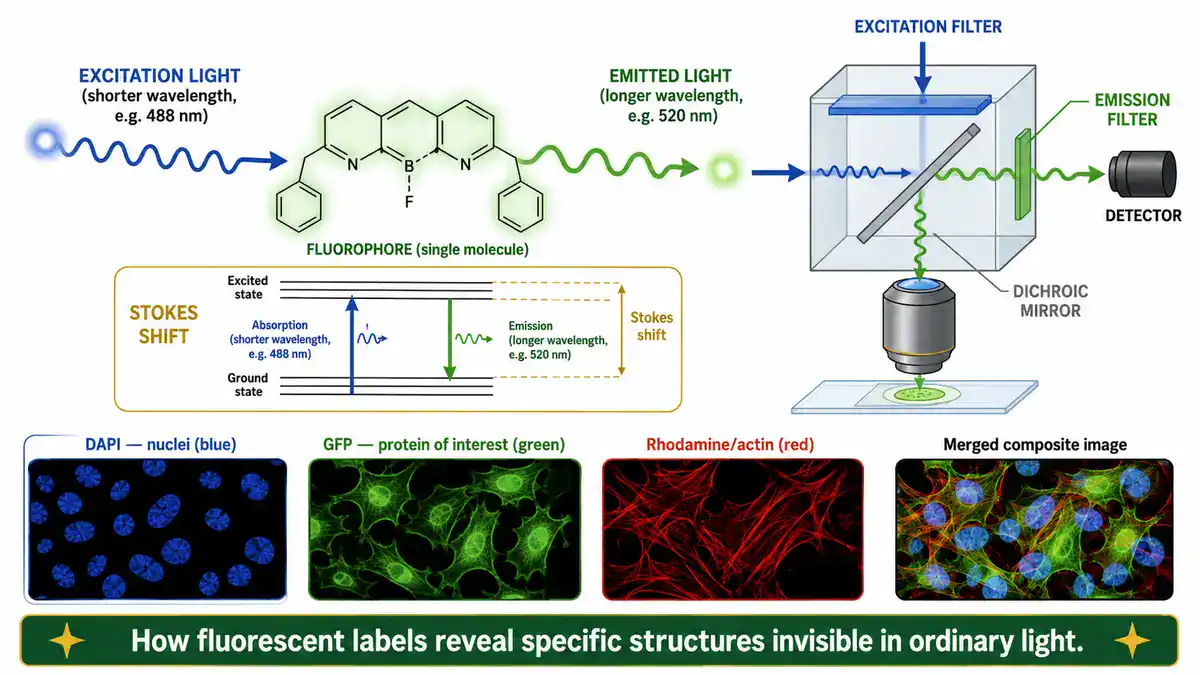
Evident Scientific explains that fluorescence involves atoms or molecules absorbing light at a particular wavelength and then emitting light of a longer wavelength after a short interval. See Fluorescence Microscopy Principles.
A useful fluorescence microscopy protocol should state the fluorophore or fluorescent protein, excitation and emission channels, filter set, objective lens, exposure time, light intensity, detector gain, mounting medium, antifade reagent if used, controls, and image-processing rules. It should also state whether the sample is fixed or living.
Fluorescence images can be powerful, but they are easy to overinterpret. Bright signal does not automatically prove specific staining. A good fluorescence protocol should include controls such as unstained samples, single-color controls, no-primary-antibody controls, secondary-only controls, known positive samples, known negative samples, and consistent imaging settings when comparing groups.
Confocal Microscopy
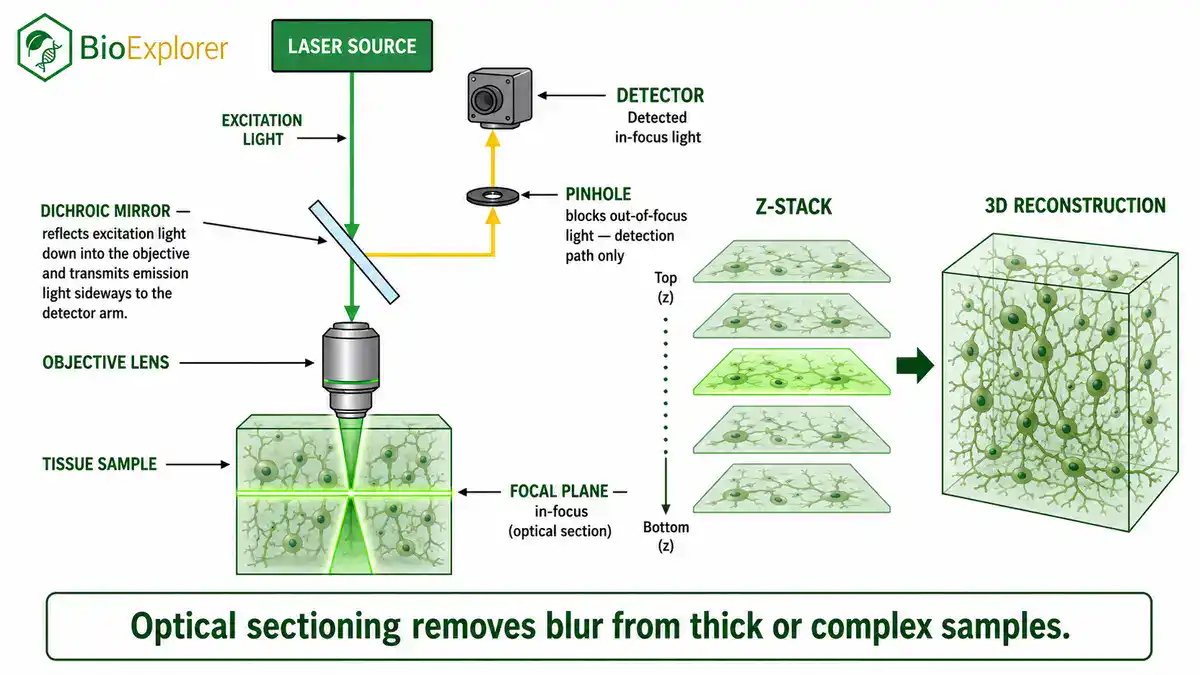
Confocal microscopy is commonly used when a sample is too thick or too complex for ordinary widefield fluorescence imaging. It uses optical sectioning to reduce out-of-focus light, making it useful for z-stacks, tissue sections, thick cells, organoids, embryos, and 3D reconstruction.
Nikon's MicroscopyU is a major educational resource for optical microscopy and includes technical resources on confocal, fluorescence, phase contrast, DIC, polarized light, stereomicroscopy, and digital imaging. See Nikon MicroscopyU.
A useful confocal microscopy protocol should state the fluorophores, laser lines, emission windows, objective lens, pinhole setting, scan speed, averaging, z-step size, detector gain, laser power, tile scan settings if used, and image-analysis plan. If the goal is colocalization, the protocol should also include channel bleed-through checks, single-label controls, and a quantitative analysis method.
Confocal microscopy is not automatically "better" than widefield fluorescence. It is better for certain questions, especially optical sectioning and thick samples. For thin, bright samples, widefield may be faster, gentler, and less prone to photobleaching. The best method depends on the question.
Live-Cell Imaging
Live-cell imaging records living cells over time. It is used to study cell division, migration, organelle movement, wound closure, immune-cell interactions, signaling dynamics, development, infection, drug response, and cell death.
A review on live-cell microscopy notes that fluorescence microscopy can reveal spatiotemporal localization of subcellular structures and proteins, but it also warns that many steps in live-cell imaging and analysis can introduce artifacts. See Live cell microscopy: From image to insight.
A useful live-cell imaging protocol should state cell type, culture vessel, coating, medium, temperature, CO2, humidity, objective lens, imaging interval, total duration, light dose, exposure, fluorescent labels, autofocus method, field selection, and analysis method. It should also state how phototoxicity, photobleaching, focus drift, evaporation, and cell stress will be checked.
Live-cell imaging can quietly change the thing being measured. Too much light, too frequent imaging, unstable temperature, poor medium buffering, or long time outside the incubator can alter cell behavior. A good protocol protects the cells first and the image second.
Immunofluorescence and Immunocytochemistry
Immunofluorescence microscopy uses antibodies and fluorescent tags to visualize proteins, antigens, organelles, or cell markers. In cultured cells, this is often called immunocytochemistry. In tissue sections, related workflows may be called immunofluorescence or immunohistochemistry, depending on the detection method.
A good immunofluorescence protocol should state the fixation method, permeabilization method, blocking reagent, primary antibody, secondary antibody, nuclear counterstain, wash conditions, mounting medium, microscope settings, controls, and image-analysis plan. For antibody-based microscopy, validation matters because nonspecific staining can look convincing.
BioExplorer's Immunology Methods and Protocols page covers antibody selection, antibody validation, immunofluorescence, immunohistochemistry, flow cytometry, ELISA, and ELISpot in more detail.
Electron Microscopy: TEM and SEM
Electron microscopy uses electrons instead of visible light to reveal much finer structural detail than ordinary light microscopy. Two common biological methods are transmission electron microscopy, or TEM, and scanning electron microscopy, or SEM.
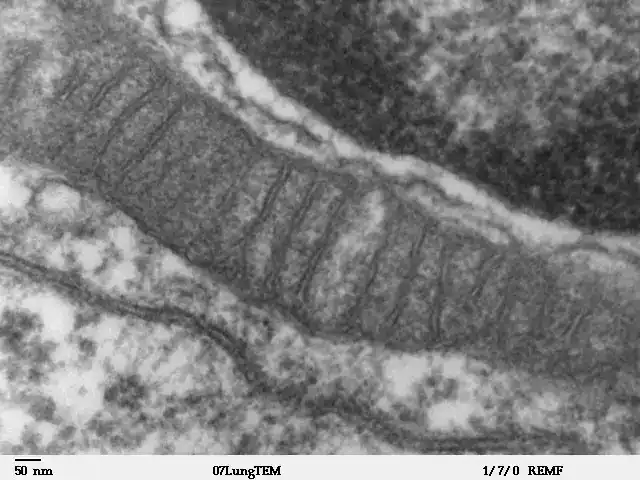
(Louisa Howard, Public domain, via Wikimedia Commons)
LibreTexts/OpenStax explains that electron microscopy focuses electrons on the specimen using magnets and that TEM and SEM are two common forms. It also describes scanning probe microscopy as a method that uses sharp probes interacting with a specimen surface. See Instruments of Microscopy.
TEM is often used to examine internal ultrastructure in very thin sections, such as membranes, organelles, viruses, bacteria, and tissue architecture. SEM is often used to examine surface structure, such as microbial surfaces, tissues, insects, plant surfaces, and materials. Both require specialized preparation and interpretation.
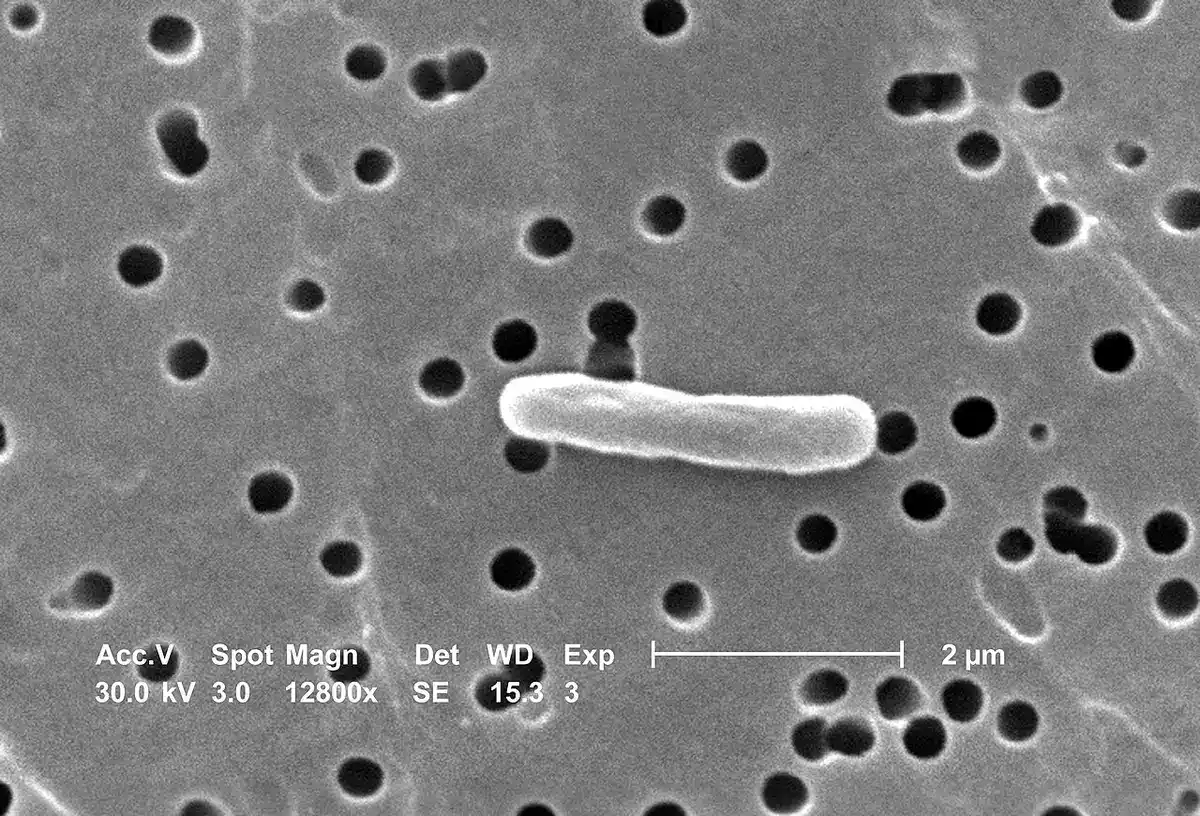
(CDC/Evangeline Sowers, Janice Carr, Public domain, via Wikimedia Commons)
A useful electron microscopy protocol should state fixation, dehydration, embedding, sectioning, staining or coating, grid or mount type, microscope type, accelerating voltage, detector, magnification, calibration, and image-processing rules. Electron microscopy can produce beautiful images, but preparation artifacts are a serious concern.
Stereomicroscopy and Dissecting Microscopes
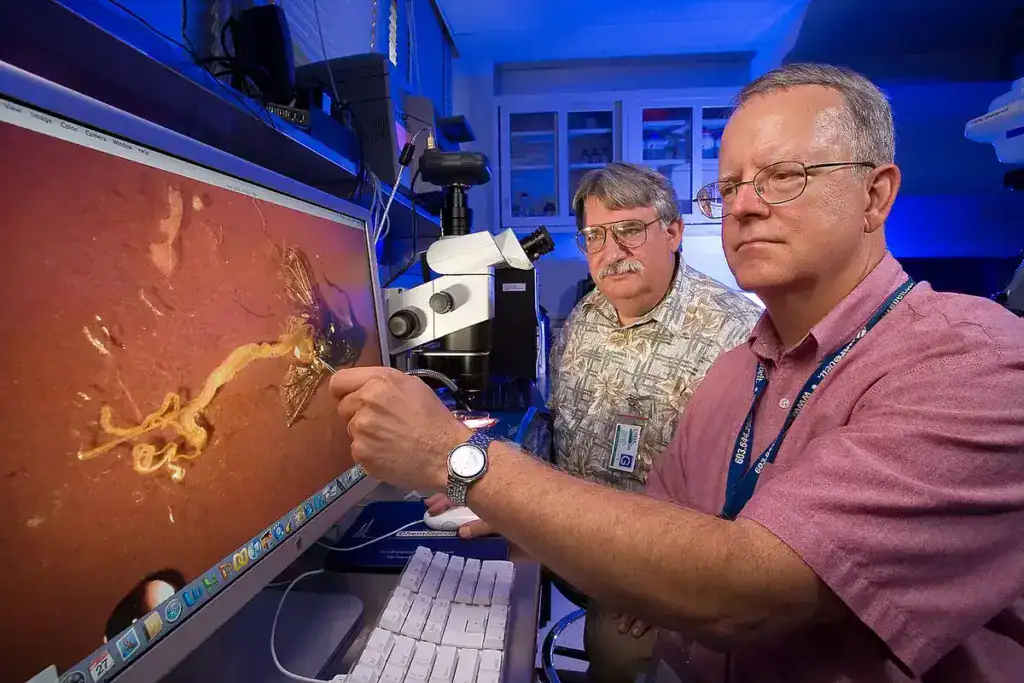
Stereomicroscopy, also called dissecting microscopy, is used for larger specimens that do not need the high magnification of compound light microscopy. It gives a three-dimensional view and is useful for insects, plant parts, embryos, small animals, dissections, tissue handling, colony picking, and specimen sorting.
A stereomicroscopy protocol should state the specimen type, lighting method, magnification range, background, positioning, imaging angle, scale bar, and whether the specimen is living, fixed, preserved, dissected, or manipulated during observation.
Stereomicroscopy is often underrated because it is less glamorous than confocal or electron microscopy. For whole organisms, dissections, colony selection, and gross morphology, it may be the best tool.
Super-Resolution and Advanced Microscopy
Super-resolution microscopy refers to fluorescence imaging approaches that can resolve structures below the ordinary diffraction limit of conventional light microscopy. Examples include structured illumination microscopy, stimulated emission depletion microscopy, and single-molecule localization microscopy.
Advanced methods can be extremely useful, but they are not shortcuts. They require careful labeling, controls, calibration, image reconstruction, and interpretation. A super-resolution image can be misleading if the labeling density, fluorophore behavior, sample preparation, or reconstruction settings are poor.
Use advanced microscopy when the biological question needs it. If ordinary widefield or confocal microscopy answers the question reliably, a more complex method may add cost and artifacts without adding clarity.
Sample Preparation for Microscopy
Microscopy often succeeds or fails before the sample reaches the microscope. A weak sample-preparation protocol can ruin a strong imaging method.
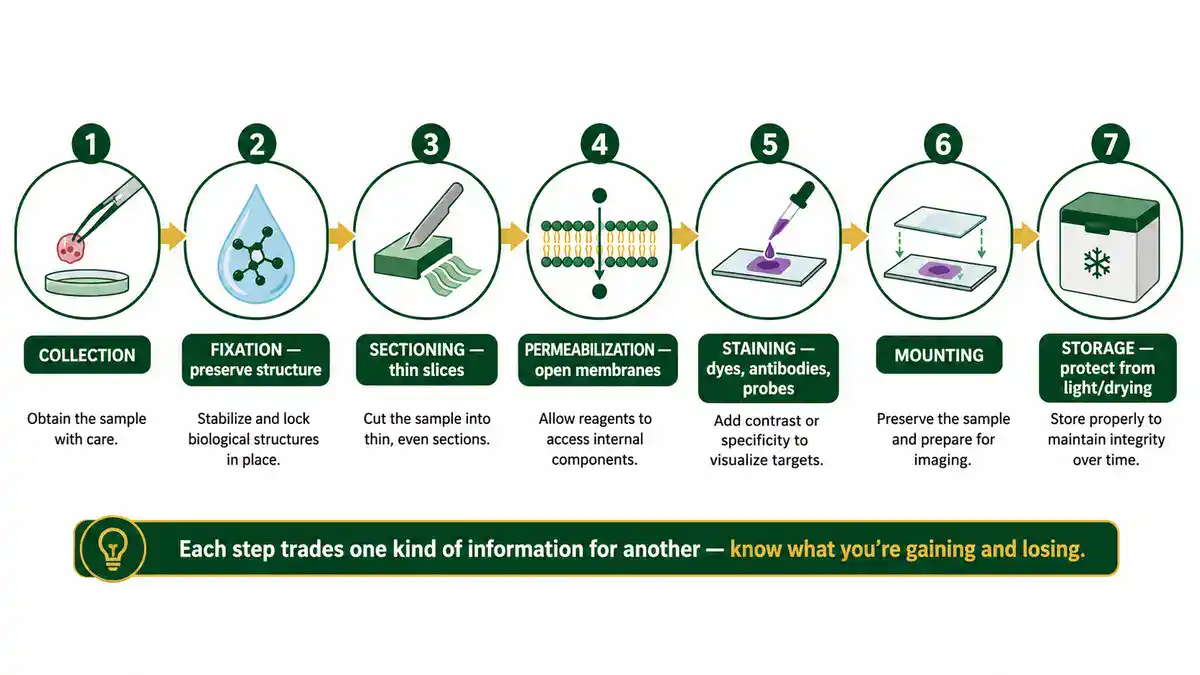
Common microscopy preparation steps include:
- Collection: obtain cells, tissues, microbes, fluids, embryos, plant material, or environmental samples without damaging the feature of interest.
- Fixation: preserve structure or molecular location, often using chemical fixatives or physical methods.
- Sectioning: cut tissues into thin slices for transmitted-light, fluorescence, or electron microscopy.
- Permeabilization: open cell membranes enough for antibodies or dyes to enter, when needed.
- Staining: add dyes, antibodies, fluorescent proteins, probes, or contrast agents.
- Mounting: place the sample on a slide, grid, dish, or imaging chamber in a way that preserves the sample and optical quality.
- Storage: protect samples from drying, light damage, degradation, contamination, or temperature stress.
A good microscopy protocol should explain why each preparation step is being used. Fixation may preserve structure but stop live processes. Permeabilization may reveal internal proteins but damage membranes. Sectioning may make tissue easier to image but introduce cutting artifacts. Staining may reveal a target but also add background.
Image Acquisition: What to Record Every Time
Microscope images are data. To make them useful, record enough information for someone else to understand how the image was made.
- microscope model and imaging mode
- objective lens magnification and numerical aperture
- sample preparation and stain or label
- excitation and emission settings for fluorescence
- exposure time, gain, laser power, or illumination intensity
- filter set, detector, camera, or photomultiplier settings
- pixel size, binning, z-step size, and image dimensions
- scale bar and calibration method
- number of fields, cells, tissues, organisms, or replicates
- image-processing steps such as contrast adjustment, background subtraction, thresholding, deconvolution, or stitching
If the images will be compared between treatments, acquisition settings should usually be kept consistent. Changing exposure, gain, threshold, or contrast differently between groups can create a false visual difference.
Microscopy Controls
Controls help separate real biological signal from optical artifacts, staining problems, sample-preparation effects, or image-processing mistakes.
- Unstained control: checks autofluorescence and background.
- No-primary-antibody control: checks secondary antibody background in immunofluorescence.
- Single-color controls: help detect bleed-through between fluorescence channels.
- Positive control: confirms that the stain or antibody can detect the expected target.
- Negative control: checks whether signal appears where it should not.
- Vehicle control: separates treatment effects from solvent or carrier effects.
- Live-cell health control: checks whether imaging conditions alter cell behavior.
- Calibration slide or bead standard: supports measurement, scaling, alignment, or intensity checks.
Controls should be planned before imaging, not invented after a surprising result appears.
Image Analysis and Bioimage Data
Modern microscopy often produces data for measurement, not just pictures for display. Image analysis may include cell counting, object segmentation, fluorescence intensity measurement, colocalization analysis, wound closure measurement, particle tracking, 3D reconstruction, tissue area measurement, or machine-learning-assisted classification.
A useful image-analysis protocol should state the software, version, file format, preprocessing steps, segmentation method, threshold rule, measurement units, exclusion rules, number of images, number of objects, statistical plan, and whether analysis was blinded.
A common mistake is choosing the analysis method after looking at the result. For stronger evidence, define the analysis rule before comparing conditions. If thresholds or regions of interest are adjusted manually, document how and why.
How to Choose the Right Microscopy Method
Do not choose a microscopy method only because it is advanced or visually impressive. Choose it because it matches your sample, biological question, resolution needs, contrast needs, live-cell requirements, and analysis plan.
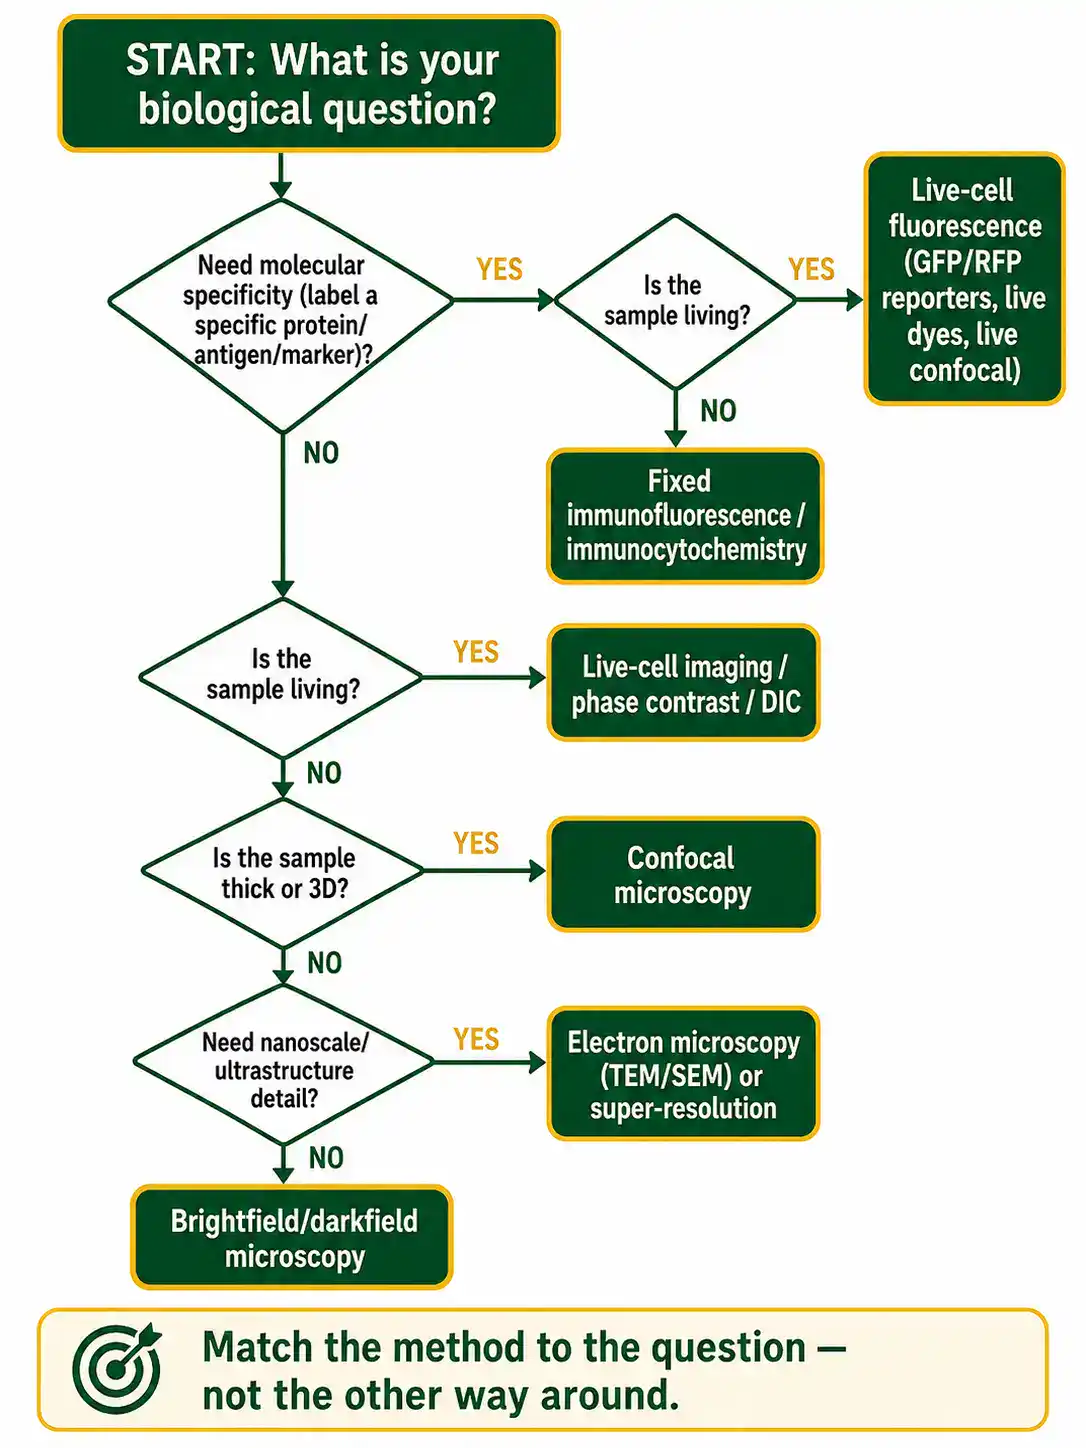
Before using any microscopy protocol, check these points:
- Sample type: cultured cells, tissue section, whole organism, microbe, plant tissue, organoid, embryo, colony, or purified material.
- Question: morphology, localization, viability, movement, ultrastructure, marker expression, tissue architecture, or quantitative measurement.
- Living or fixed: live-cell imaging needs gentle conditions, while fixed samples allow stronger staining and longer imaging.
- Resolution: decide whether light microscopy is enough or whether electron microscopy or super-resolution is needed.
- Contrast: unstained transparent samples may need phase contrast, DIC, or fluorescence.
- Thickness: thick samples may need confocal imaging, sectioning, clearing, or optical sectioning.
- Controls: plan positive, negative, unstained, single-color, and acquisition controls before imaging.
- Analysis: know whether the result will be visual, semi-quantitative, or fully quantitative.
- Safety: consider fixatives, stains, lasers, UV light, high voltage, cryogens, biological samples, and sharps.
Common Mistakes in Microscopy Protocols
Microscopy mistakes often look like biological discoveries until controls reveal the problem.
- Using the wrong imaging mode: brightfield may be poor for transparent live cells, while fluorescence may be unnecessary for simple morphology.
- Over-fixing or under-fixing samples: fixation can preserve some features while damaging others.
- Ignoring autofluorescence: tissues, plastics, media, and fixatives can produce background signal.
- Overexposing fluorescence images: saturated pixels cannot be used for reliable intensity comparisons.
- Changing settings between groups: unequal exposure or gain can create false differences.
- Forgetting scale bars: images without scale are harder to interpret or reuse.
- Using too few fields of view: a beautiful field may not represent the sample.
- Overprocessing images: aggressive contrast, denoising, thresholding, or background subtraction can change interpretation.
- Confusing colocalization with overlap by eye: visual overlap should be supported by proper controls and analysis.
- Ignoring phototoxicity: live cells can be damaged by light exposure during imaging.
- Assuming sharper means truer: deconvolution, denoising, and AI-assisted enhancement must be documented and used carefully.
- Publishing incomplete methods: missing objective, settings, stain, scale, or processing details makes images hard to interpret.
Microscopy Calculators and Lab Tools
Microscopy protocols often depend on calculations. A wrong magnification, pixel size, scale bar, field of view, dilution, stain concentration, z-step size, or time-lapse interval can affect the experiment and the final interpretation.
Useful microscopy calculators include:
- total magnification calculator
- field of view calculator
- microscope scale bar calculator
- pixel size calculator
- objective magnification calculator
- numerical aperture and resolution calculator
- z-stack step-size calculator
- time-lapse interval calculator
- fluorescence exposure comparison calculator
- cell counting from image fields calculator
- wound-healing assay closure calculator
- colocalization coefficient calculator
- image area and particle-count calculator
- slide dilution and stain preparation calculator
- camera binning and image-size calculator
BioExplorer's Biology Tools and Calculators hub is building free browser-based tools by branch of biology. As BioExplorer expands its microscopy and imaging tools, this page can link directly to magnification, scale-bar, field-of-view, wound-healing, image-counting, and fluorescence-analysis calculators.
Trusted Microscopy Method Resources
Use BioExplorer as a guide, but always check your institution's approved SOPs, instrument manuals, facility rules, imaging-core guidance, and supervisor instructions before performing real laboratory microscopy. These external resources are useful starting points for microscopy methods and protocol background:
- Nature Protocols: peer-reviewed protocol articles with design advice, troubleshooting, data analysis, limitations, and result interpretation.
- Nikon MicroscopyU: technical education on optical microscopy, fluorescence, confocal microscopy, DIC, phase contrast, polarized light, stereomicroscopy, and digital imaging.
- MyScope Light Microscopy Training: training on transmitted-light techniques such as brightfield, darkfield, phase contrast, DIC, polarized light, fluorescence, and confocal microscopy.
- Leica Phase Contrast Guide: explanation of phase contrast for observing transparent biological specimens without staining.
- Evident Scientific Fluorescence Microscopy: principles of fluorescence, excitation, emission, and fluorophore behavior.
- LibreTexts/OpenStax Instruments of Microscopy: overview of light microscopy, electron microscopy, and scanning probe microscopy.
- Live Cell Microscopy: From Image to Insight: peer-reviewed review on live-cell fluorescence microscopy, quantitative imaging, and common artifacts.
- NIGMS Image and Video Gallery: searchable scientific image collection with microscopy photos and biological images.
- Wikimedia Commons: HeLa-I.jpg: public domain NIH multiphoton fluorescence microscopy image of cultured HeLa cells.
Corrected Total Cell Fluorescence (CTCF) Calculator
Safety and Responsibility
Microscopy protocols can involve living cells, human-derived material, microbes, animal tissue, plant material, fixatives, stains, mounting media, sharps, glass slides, lasers, UV light, cryogens, vacuum systems, high voltage electron microscopes, and image-analysis software that can alter results if used carelessly. This page is educational. It does not replace formal training, institutional SOPs, microscope-facility rules, biosafety approval, chemical safety guidance, or supervision by qualified personnel.
For real laboratory work, follow approved procedures for sample handling, chemical waste, biological material, laser safety, electron microscope operation, and data reporting.
Related BioExplorer Resources
- Biology Methods and Protocols: main hub for biology lab methods, protocol categories, safety notes, and trusted resources.
- Cell Biology Methods and Protocols: methods for Cell culture, cell counting, viability, staining, microscopy, flow cytometry, and cell-based assays.
- Immunology Methods and Protocols: methods for ELISA, flow cytometry, immunofluorescence, ELISpot, antibody validation, and immune-cell analysis.
- Microbiology Methods and Protocols: methods for aseptic technique, microbial culture, Gram staining, serial dilution, CFU counting, antimicrobial testing, and biofilms.
- Molecular Biology Methods and Protocols: protocols for DNA, RNA, PCR, cloning, gel electrophoresis, sequencing prep, and molecular analysis.
- Cell Biology Glossary: clear definitions of cells, organelles, membranes, cytoskeleton, mitosis, and related terms.
- Biology Tools and Calculators: free browser-based biology calculators and educational tools.
Frequently Asked Questions
Microscopy methods are imaging techniques used to observe small biological structures such as cells, tissues, microbes, organelles, proteins, chromosomes, and ultrastructure under magnification.
Common biology microscopy methods include brightfield, darkfield, phase contrast, DIC, fluorescence, confocal, live-cell imaging, stereomicroscopy, electron microscopy, and super-resolution microscopy.
Brightfield microscopy is best for stained or naturally pigmented specimens such as tissue sections, microbial smears, plant tissues, prepared slides, and routine classroom or diagnostic observations.
Phase contrast microscopy is useful for observing transparent, unstained living cells because it improves contrast without requiring dyes that may harm or alter the specimen.
Fluorescence microscopy is used to detect specific molecules, proteins, organelles, cells, pathogens, antibodies, reporter genes, or nucleic acids using fluorescent labels or fluorescent proteins.
Widefield fluorescence microscopy collects fluorescence from the whole illuminated field. Confocal microscopy reduces out-of-focus light and collects optical sections, which is especially useful for thicker samples and 3D imaging.
Electron microscopy is used to study ultrastructure at much higher resolution than ordinary light microscopy, including membranes, organelles, viruses, bacterial surfaces, tissue fine structure, and nanoscale features.
Controls help distinguish real biological signal from autofluorescence, nonspecific staining, bleed-through, sample-preparation artifacts, uneven illumination, overexposure, and image-processing errors.
Not always. Online protocols vary in quality and may not match your sample, instrument, stain, biosafety level, or facility rules. For real lab work, follow approved SOPs, instrument manuals, safety guidance, and supervisor instruction.
Cite this page
BioExplorer. (2026, September 30). Microscopy Methods and Protocols. https://www.bioexplorer.net/methods_and_protocols/microscopy_methods/